

You have a fantastic idea for a student video project—maybe a 60-second book trailer, a quick science lab recap, or a historical character monologue. Then reality sets in: if you assign a video project to 30 middle schoolers, you are going to spend three full class periods just teaching them how to trim clips, layer audio, and stop messing with transitions.
When the tech takes more time than the learning, it is time for a simpler workflow.
Enter Google Vids. Because Google Vids works almost identically to Google Slides—complete with scenes instead of slides and a familiar toolbar—students on Chromebooks can figure it out in minutes. Even better, Google Vids plays nicely with Google Classroom’s best time-saving feature: “Make a copy for each student.”
By building a quick scene-by-scene template with clear instructions right on the canvas, you eliminate the blank-page panic and keep students focused on showing what they know. Here is how to set up your first Google Vids template.
Related Post: Getting Started with Google Vids
Create a Google Vids Template for Short Projects
If you want to let students demonstrate their mastery of a topic through video, you need to be organized and efficient. Here’s why creating a Google Vids Template makes a lot of sense:
- Zero setup time: Students do not waste 20 minutes picking fonts, background colors, or aspect ratios.
- Built-in pacing: Setting the scene durations in advance naturally keeps students within your 30-to-60-second time limit.
- Clear expectations: Placeholder text and video boxes tell students exact requirements for every 10-second chunk of their video.
Step-by-Step: Building Your Google Vids Template
1.Start a fresh project in Google Vids: Visit vids.new to create a new project. Select your desired aspect ratio at the top of the screen (landscape, portrait, or square). You’ll be prompted with a bunch of options, but I recommend that you skip the templates and create a BLANK project.
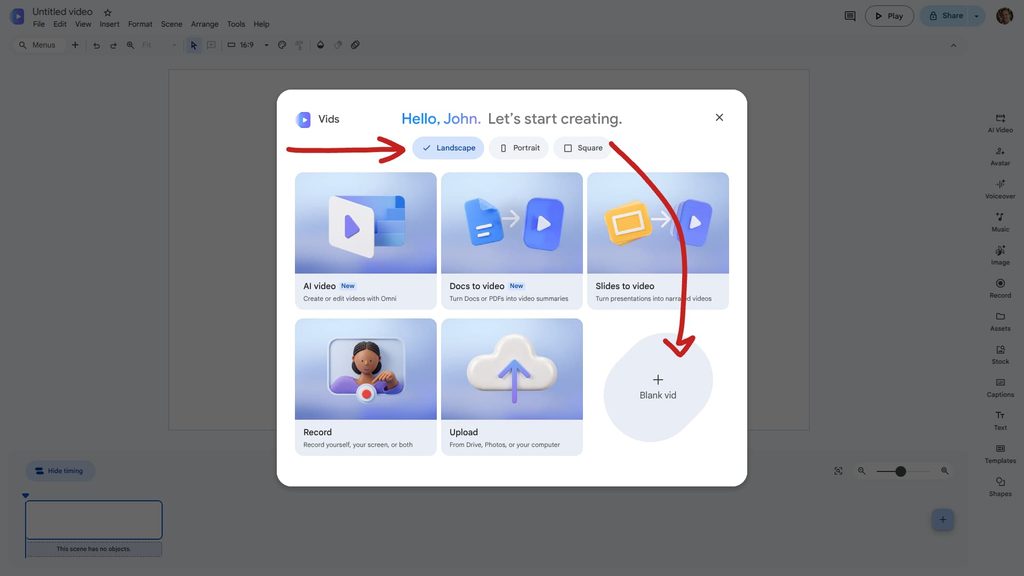
2.Map out your scenes like Google Slides: Look at the timeline along the bottom of your screen. Think of each scene as a single slide. Click the + (Add scene) button to create the exact number of scenes your assignment requires. For a 45-second mastery check, four scenes at 10–12 seconds each is the sweet spot. You can drag the edges of each scene in the timeline to lock in your target pacing.
Want an example? Click here to make a copy of my gratefulness Google Vids Project template!
3.Add placeholder text with clear student prompts: Click into your first scene and use the Text box tool to write instructions directly on the screen—just like you would on a Slides graphic organizer. Use bracketed prompts so students know what to delete and replace (for example: [TYPE YOUR CLAIM HERE - Delete these brackets when finished]).

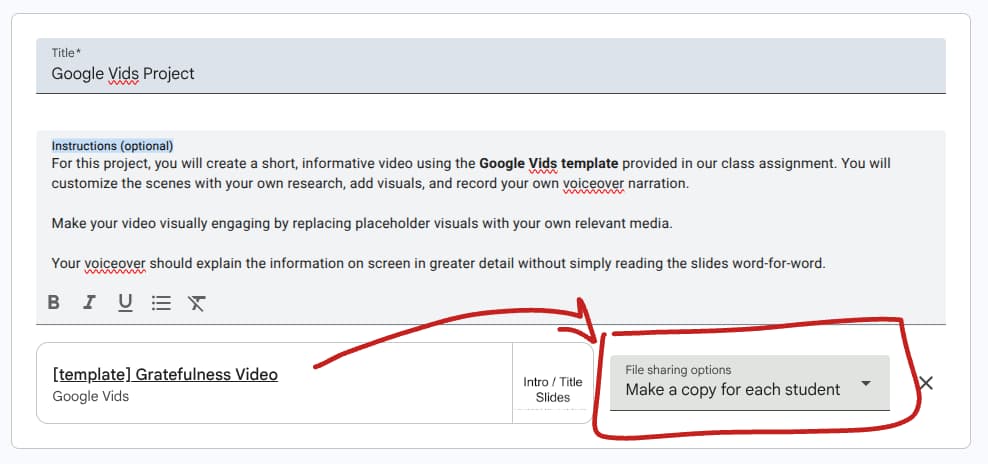
4.Assign via Google Classroom using Make a Copy: Head over to Google Classroom, open your Classwork tab, and click Create > Assignment. Click the Drive icon, select your finished Google Vids template, and click Add. Next to the attachment, click the dropdown menu (which defaults to Students can view file) and switch it to Make a copy for each student before clicking Assign.
Quick Classroom Management Tip
Remind your students of one golden rule before they hit record: fill in the text first, record second. Because Google Vids includes a built-in teleprompter inside the recording studio, students can paste their scene notes right into the script panel and read smoothly while looking at their Chromebook camera. No cue cards required!
Want more practical, low-prep Chromebook and Google Workspace tips delivered straight to your inbox? Sign up for my free monthly newsletter, The Google Edu Update, to get classroom-tested templates, new feature breakdowns, and quick EdTech wins every month.


Reader Interactions